Minecraft's default textures are iconic, sure, but they're also undeniably chunky. After playing the same blocks for years, those pixelated grass blades start to feel a bit stale. Finding a high-quality Resource Pack For Minecraft Java is the quickest way to make your world feel brand new without changing a single line of code. It's not just about making things look "pretty." It's about personalizing the vibe of your survival world or giving your builds the specific aesthetic they deserve. Whether you want ultra-realistic 512x textures that make your GPU sweat or a cozy, simplified look that boosts your frames, the options are practically endless.
How Texture Resolutions Actually Affect Your Game
Most players think a higher number always means a better experience. That's a trap. Texture packs are measured in powers of two, starting from the default 16x16 pixels per block. You'll see 32x, 64x, 128x, 256x, and even 1024x options. Here's the reality: 32x and 64x are the sweet spots. They stay true to the blocky charm while adding enough detail to remove that "blurry" look when you stand close to a wall.
When you jump to 256x or higher, you're entering the territory of photorealism. These often require a beefy PC. If you don't have at least 8GB of VRAM on your graphics card, these high-res assets will cause stuttering. You'll likely see your frame rate tank the moment you enter a dense jungle or a massive storage room. I've seen players try to run 512x textures on integrated graphics. It doesn't end well. The game usually crashes before the main menu even loads.
The Physics of Parallax Occlusion Mapping
If you really want to push the limits, look for files that support POM (Parallax Occlusion Mapping). This tech gives flat textures 3D depth. Instead of a flat brick wall, the mortar actually looks recessed, and the bricks look like they're popping out. To use this, you need more than just the assets; you need a shader pack that can read the height maps included in the files. This is where the game stops looking like a sandbox and starts looking like a modern AAA title.
Finding The Best Resource Pack For Minecraft Java
Choosing the right one depends on your playstyle. Are you a builder? You probably want something with connected textures. This feature makes glass panes look like one solid sheet instead of a grid of squares. It makes a massive difference in modern skyscraper builds. If you're a PvPer, you'll want "short swords" and "low fire." These modifications ensure your equipment doesn't block your view during a fight. There's nothing worse than losing a duel because a giant flame animation covered your entire screen.
Stylized vs Realistic Approaches
Stylized packs are often more popular because they age better. Think of something like "Sphax PureBDcraft." It looks like a comic book. It’s vibrant, sharp, and consistent. Realistic packs, on the other hand, often suffer from "tiling" issues. This happens when a repeating texture—like stone or dirt—shows a visible pattern across a large flat area. It breaks the immersion. Good creators use "randomized textures" to fix this, ensuring that every few blocks of dirt look slightly different from the ones next to them.
Installation Steps and Common Failures
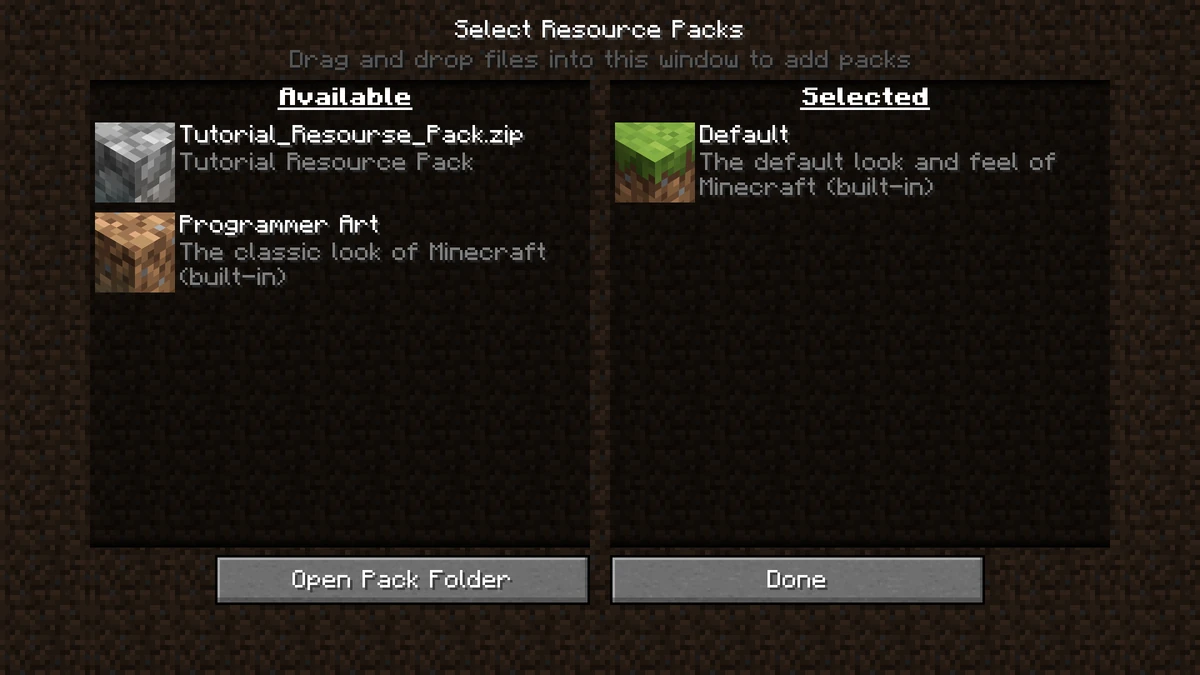
Installing these isn't hard, but people mess it up constantly. First, you need to find your "resourcepacks" folder. The easiest way is to open the game, go to Options, then Resource Packs, and click "Open Pack Folder." Just drag your downloaded .zip file in there. Don't unzip it. The game reads the zip directly. If the pack doesn't show up, you likely have a "folder within a folder" situation. Open the zip and make sure the "assets" folder and the "pack.mcmmo" file are right at the top level.
Version Compatibility and The Red Text Warning
You'll often see a red warning saying a pack is "Incompatible" because it was made for an older version of the game. Most of the time, you can ignore this. If the creator only changed stone and wood textures, those internal file names haven't changed in years. However, if you're using a pack from version 1.12 on version 1.20, expect issues. Mojang changed the "flattening" of IDs, meaning old packs won't recognize new blocks like cherry wood or deepslate. You'll just see the default textures for those new items.
Performance Optimization Secrets
Adding high-definition assets will tax your RAM. Minecraft Java is notorious for how it handles memory. By default, the launcher only allocates 2GB of RAM. If you're running a heavy Resource Pack For Minecraft Java, you need to bump that up. Open your launcher, go to "Installations," edit your profile, and click "More Options." In the "JVM Arguments" box, change -Xmx2G to something like -Xmx4G or -Xmx6G. Don't give it your whole 16GB of RAM, though. That actually makes the game run worse because the "garbage collection" process becomes inefficient.
The Role of Fabric and Iris
In the past, OptiFine was the only way to get the most out of your visuals. Today, the community has largely shifted toward the Fabric loader. Using mods like Sodium and Iris provides significantly better frame rates than OptiFine ever did. Iris allows you to toggle shaders on and off instantly without reloading the entire game. This is huge when you're testing how different textures look under various lighting conditions. If you're serious about your game's appearance, moving to a Fabric-based setup is the smartest move you can make.
Essential Features To Look For
A great pack is more than just new pictures for blocks. It changes the atmosphere. Look for custom skyboxes. Instead of the square sun and moon, some packs offer realistic clouds, rotating star maps, and even planets visible at night. This doesn't affect your FPS much, but it completely changes how the game feels when you're out exploring.
Custom Entity Models
Some creators go beyond textures and change the actual shapes of mobs. This is called CEM (Custom Entity Models). You might find a pack that turns wolves into different dog breeds or gives villagers more realistic human proportions. These usually require Modrinth or CurseForge mods to work properly. Without the right "entity model features" mod, the game will just ignore these changes and show the standard blocky mobs.
Sound Design Overhauls
Don't ignore the ears. Some of the best visual overhauls include custom sound packs. Imagine walking through a forest and hearing actual bird calls or rustling leaves instead of the generic "thump thump" of footsteps. High-end packs sometimes replace the menu music or the ambient cave sounds. It adds a layer of dread to underground exploration that the base game sometimes lacks.
Common Mistakes When Modding Visuals
The biggest mistake is "over-modding." You download a heavy texture pack, a heavy shader, and a bunch of 3D item mods. Suddenly, your game takes five minutes to load and crashes when you open a chest. Start small. Load one pack at a time. See how it affects your "one percent low" frame rates—that's the stuttering you feel even if your average FPS looks high.
Another error is ignoring the "internal" resolution of your monitor. If you're playing on a 1080p screen, a 1024x texture pack is mostly wasted pixels. Your monitor literally can't display that level of detail. You're just heating up your room for no reason. Stick to 64x or 128x for 1080p gaming. Save the ultra-heavy files for 4K displays where you can actually see the grit in the gravel.
The Community Ethics of Texture Use
Always get your files from reputable sites. There's a dark side to this community where people "re-upload" famous packs with malware hidden inside. Stick to CurseForge or Modrinth. Avoid those random "Top 10 Minecraft Packs" websites that look like they were built in 2005. They often host outdated versions or stolen assets. Support the original creators. Many of them spend thousands of hours hand-painting these textures. If they have a Patreon or a direct tip jar, consider it.
Why Some Packs Cost Money
You'll find some "Realism" packs locked behind a paywall. This is a point of huge debate in the community. Mojang's EULA (End User License Agreement) is pretty strict about selling game content. Usually, creators get around this by offering a "Lite" version for free and keeping the 512x or 1024x versions for supporters. Honestly? Some of them are worth it. The level of detail in a pack like Stratum or Patrix is insane. It's like a different game. Just be aware of what you're buying and check reviews first.
Customizing Your Own Experience
You don't have to use a pack exactly as it comes. You can mix and match. If you love the UI of one pack but the grass of another, you can stack them. In the Resource Packs menu, the game reads the list from top to bottom. If two packs change the same block, the one on top wins. This allows you to create a "Frankenstein" setup that's perfect for you. I often put a "3D Doors" pack on top of a standard medieval pack to get the best of both worlds.
Editing the Files Yourself
If you're feeling adventurous, you can open the .zip file and delete things you don't like. Don't like the custom pumpkin blur? Find the pumpkin_blur.png in the GUI folder and delete it. The game will revert to the default file. It's an easy way to tweak a pack that's almost perfect but has one or two annoying features. Just make sure you keep a backup of the original zip before you start poking around in the folders.
What To Do Next
Ready to upgrade? Here is how you should handle it right now.
- Check your specs. Look at your VRAM. If you have less than 4GB, stay under 64x resolution. If you have 8GB or more, feel free to experiment with 256x or higher.
- Install a loader. Grab Fabric. It's faster and more modern than Forge for purely visual upgrades.
- Get the performance mods. Download Sodium and Iris. This is the foundation for any good-looking Minecraft setup.
- Browse the big sites. Go to Modrinth or CurseForge. Filter by "Most Downloaded" to see what the community trusts. Look for packs like "Faithful" (if you want the vanilla look but sharper) or "Stay True" (which adds variety without changing the soul of the game).
- Test in different biomes. Don't just look at the dirt in front of you. Go to a swamp, a desert, and the Nether. Some packs look great in the sunshine but absolutely terrible in the red fog of the Nether.
- Adjust your RAM. Give the game 4GB or 6GB of memory in the launcher settings to prevent "Out of Memory" crashes during world loading.
Stop playing with those blurry 2011 textures. The community has built some of the most beautiful digital art imaginable, and most of it is free. It takes five minutes to set up and completely changes the way you experience the game. Pick a style, load it up, and see your world in a new light.